k8s-Application Lifecycle Management
Rolling Updates and Rollbacks
Rollout Command
kubectl rollout status: to see the revisions and history of rollout.1
kubectl rollout status deployment/myapp-deployment
kubectl rollout history:show the revisions and history of our deployment.1
kubectl rollout history deployment/myapp-deployment
Default deployment strategy
rolling update
Rollback
If there’s something wrong with the newest version,use the kubectl rollout undo command to rollback your application to a previous reversion to undo a change.
1 | kubectl rollout undo deployment/myapp-deployment |
Summary Command
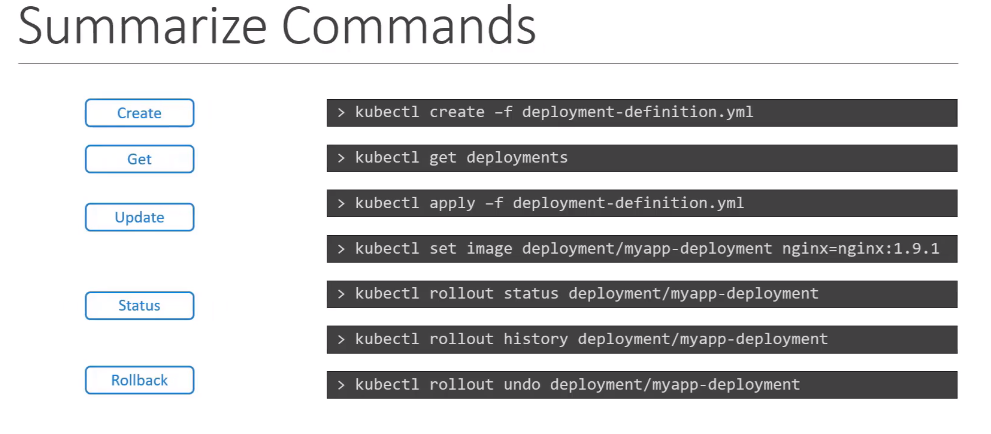
Commands
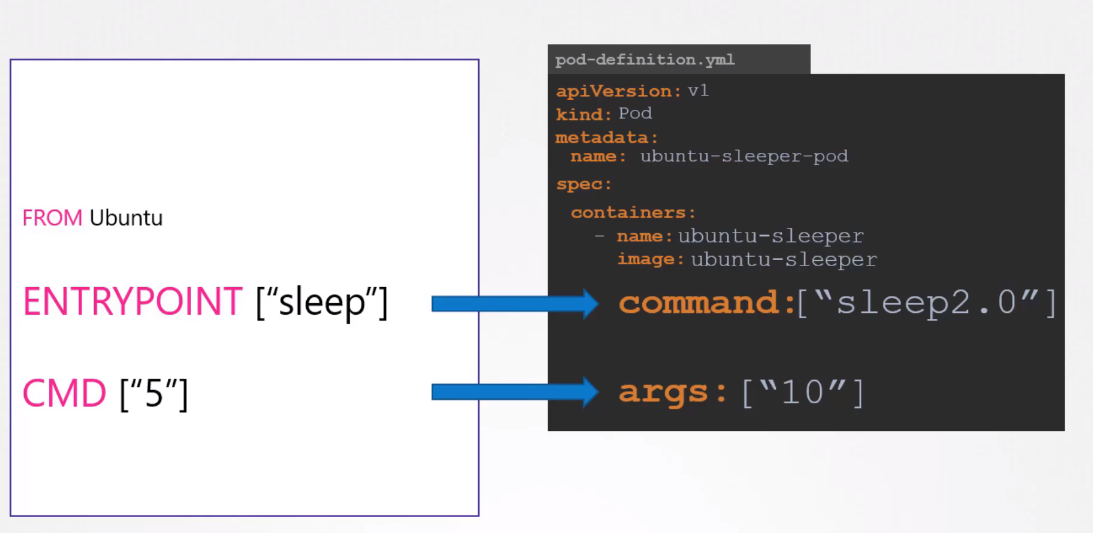
The Dockerfile has an Entrypoint as well as a CMD instruction specified.
The entrypoint is the command that is run at startup, and the CMD is the default parameter passed to the command.
Dockerfile1
2
3FROM Ubuntu
ENTRYPOTINT ["sleep"]
CMD ["5"]pod-definition.yml1
2
3
4
5
6
7
8
9
10apiVersion: v1
kind: Pod
metadata:
name: ubuntu-sleeper-pod
spec:
containers:
- name: ubuntu-sleeper
image: ubuntu-sleeper
command: ["sleep2.0"]
args: ["10"]
The command option in the pod definition file override ENTRYPOINT in the Dockerfile.
The args option in the pod definition file override the CMD instruction in the Dockerfile.
Configure Environment Variables in Applications
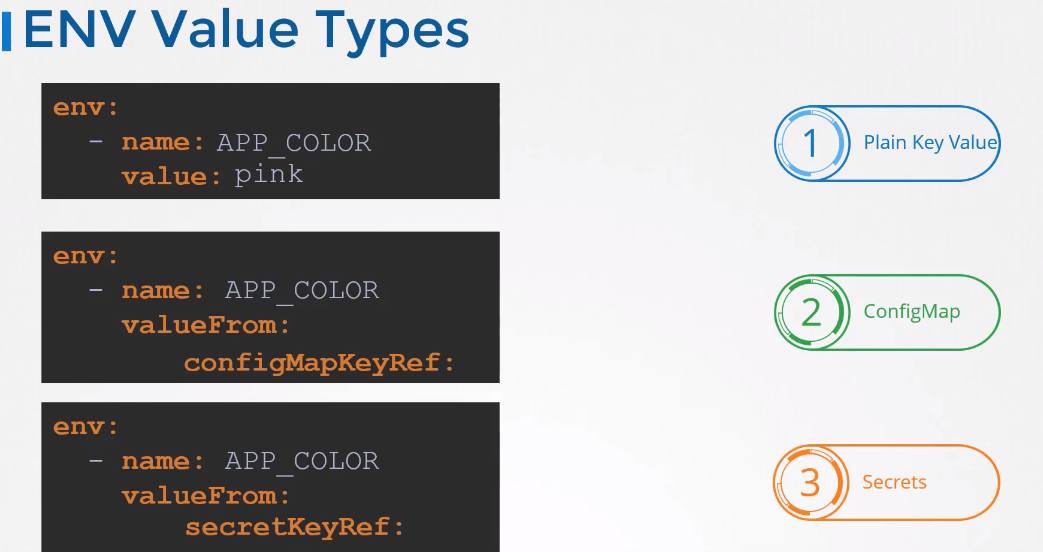
Use the ENV property to set an environment variable
ENV is an array,each item in the array has a name and a value property.
set env with docker run
docker run -e APP_COLOR=pink simple-webapp-colorENV Variable in k8s
pod-definition.yaml1
2
3
4
5
6
7
8
9
10
11
12
13apiVersion: v1
kind: Pod
metadata:
name: simple-webapp-color
spec:
containers:
- name: simple-webapp-color
image: simple-webapp-color
ports:
- containerPort: 8080
env:
- name: APP_COLOR
value: pink
ENV Value Types
ConfigMaps
ConfigMaps are used to pass configuration data in the form of key value pairs in Kubernetes
There are two phases involved in configuring ConfigMaps.
Two Step to use configMaps:
First create the ConfigMaps and second Inject them into the POD.
The imperative way
Use the kubectl create configmap command
app_config.properties
1 | APP_COLOR: blue |
--from-literal1
kubectl create configmap <config-name> --from-literal=<key>=<value>
1
kubectl create configmap app-config --from-literal=APP_COLOR=blue --from-literal=APP_MODE=prod
--from-file1
kubectl create configmap <config-name> --from-file=<path-to-file>
1
kubectl create configmap app-config --from-file=app_config.properties
Declarative way
config-map
1 | APP_COLOR: blue |
config-map.yaml1
2
3
4
5
6
7apiVersion: v1
kind: ConfigMap
metadata:
name: app-config
data:
APP_COLOR: blue
APP_MODE: prodkubectl create -f config-map.yaml
View ConfigMaps
kubectl get configmapskubectl describe configmaps
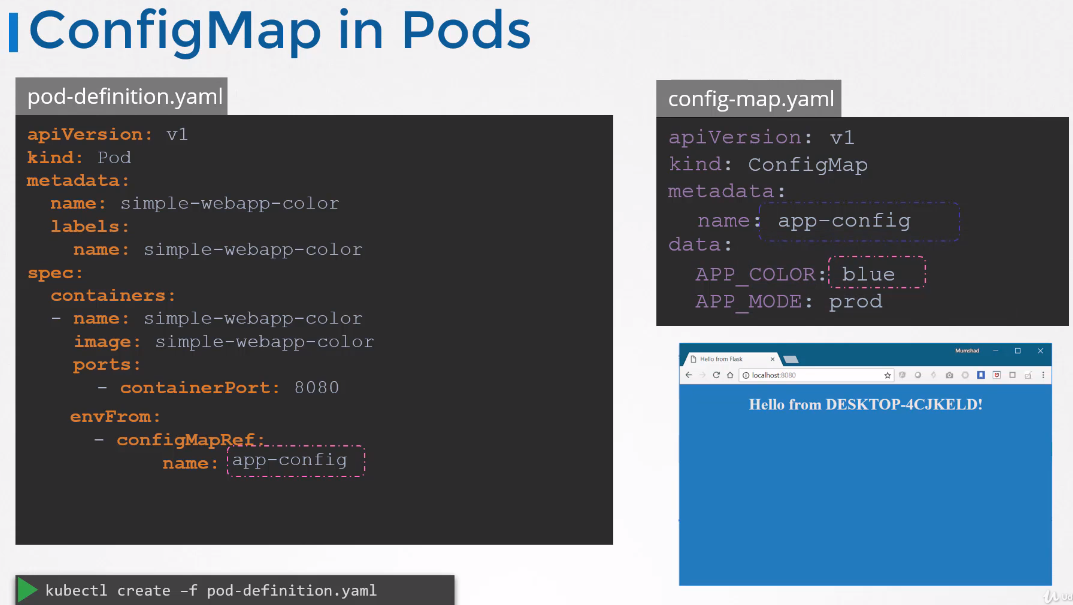
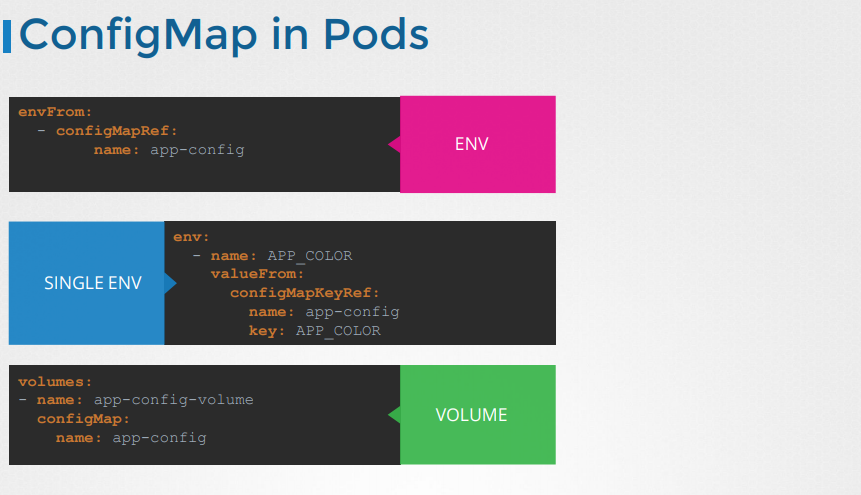
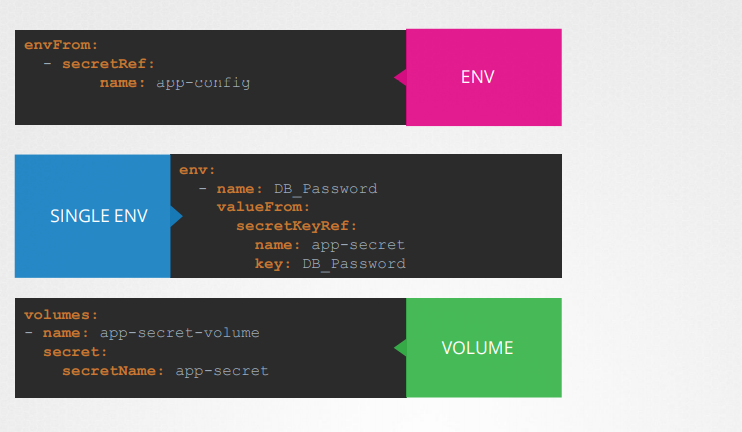
ConfigMap in Pods
Use envFrom to inject an environment variable to the container.
The envFrom property is a list, so we can pass as many environment variables as required
pod-definition.yaml
1 | apiVersion: v1 |
This is how we inject a specific configmap from the ones we created before.
Other inject ways
- SIGLE ENV: inject as single environment variables
- VOLUME: Inject the whole configmap files in a volume if you were to mount the configmap as a volume in the pod.
Configure Secrets in Applications
Secrets are used to store sensitive information like passwords or keys.
Two step to use secrets:
First create the secret and second injected into pod.
Imperative way
Secret need to be created.
1 | DB_HOST: mysql |
--from-literal1
kubectl create secret generic <secret-name> --from-literal=<key>=<value>
1
kubeclt create secret generic app-secret --from-literal=DB_HOST=mysql --from-literal=DB_USER=root --from-literal=DB_PASSWORD=paswrd
--from-file1
kubectl create secret generic <secret-name> --from-file=<path-to-file>
1
kubectl create secret generic app-secret --from-file=app_secret.properties
Declarative way
Secret need to be created.
1 | DB_HOST: mysql |
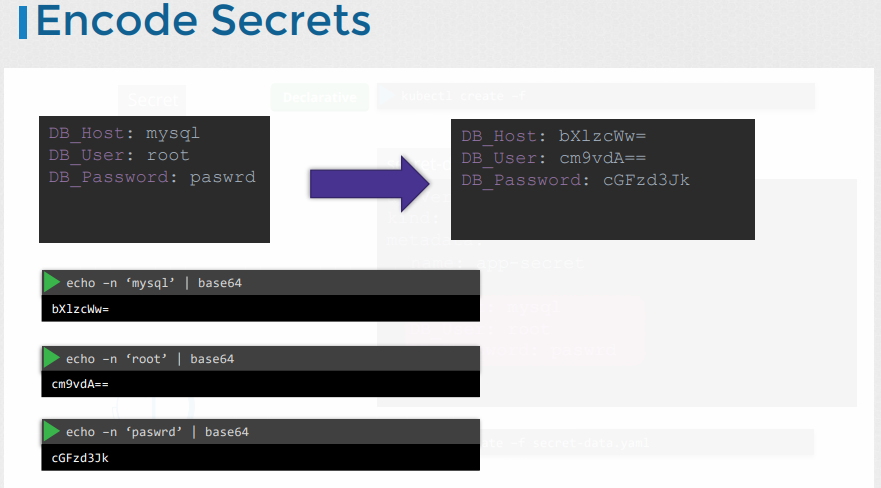
secret-data.yamlWhile creating a secret with a declarative approach you must specify the secret values in a hashed
format.
secret-data.yaml1
2
3
4
5
6
7
8apiVersion: v1
kind: secret
metadata:
app-secret
data:
DB_HOST: bXlzcWw=
DB_User: cm9vdA==
DB_PASSWORD: cGFzd3Jk
kubectl create secret -f secret-data.yaml
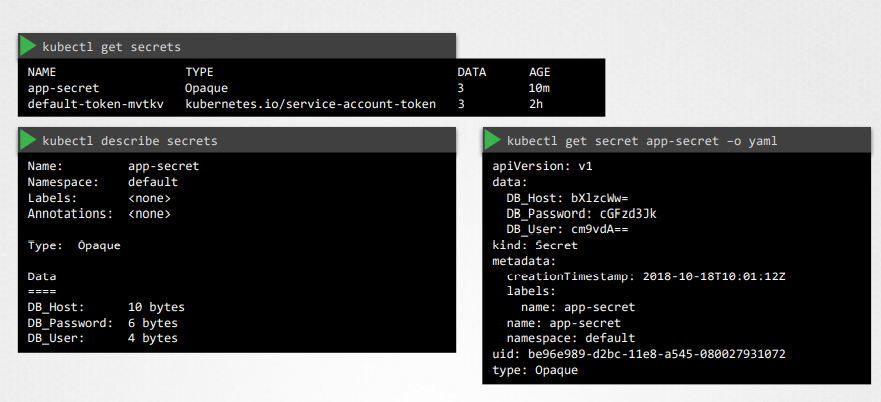
View Secrets
kubectl get secretskubectl describe secrets:This shows the attributes in the secret but hides the valuekubectl get secret app-secret -o yaml:see the hashed values
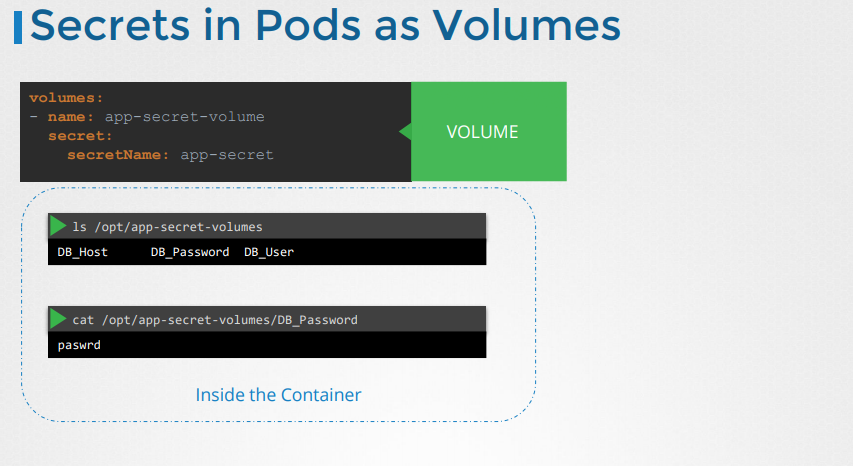
Secrets in Pods
To inject an environment variable, add a new property to the container called envFrom.(list)
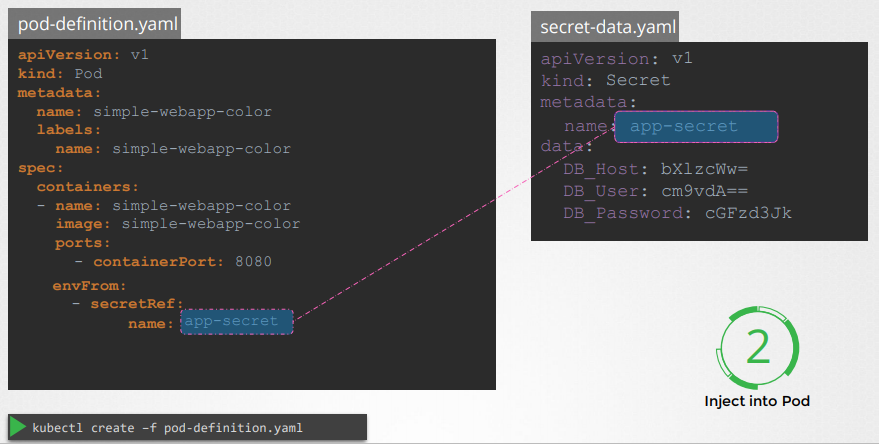
pod-definition.yaml
1 | apiVersion: v1 |
kubectl create -f pod-definition.yaml
Other ways to inject secrets into Pods
- SINGLE ENV:inject as single environment variables
- VOLUME: Inject the whole secret as files in a volume
Multi-Contianer PODs
If Log Agent and WEB Server in one pods that can scale up and down together
Multi-container pods that share the same lifecycle which means they are created togethe and destroyed together.
They share the same network space which means they can refer to each other as local host and they have access to the same storage volumes.
example
pod-definition.yaml1
2
3
4
5
6
7
8
9
10
11
12
13
14apiVersion: v1
kind: Pod
metadata:
name: simple-webapp
labels:
name: simple-webapp
spec:
containers:
- name: simple-webapp
image: simple-webapp
ports:
- containerPort: 8080
- name: log-agent
image: log-agent
Multi-container PODs Design Patterns
There are 3 common patterns, when it comes to designing multi-container PODs. The first and what we just saw with the logging service example is known as a side car pattern. The others are the adapter and the ambassador pattern.

InitContainers
In a multi-container pod, each container is expected to run a process that stays alive as long as the POD’s lifecycle. For example in the multi-container pod that we talked about earlier that has a web application and logging agent, both the containers are expected to stay alive at all times. The process running in the log agent container is expected to stay alive as long as the web application is running. If any of them fails, the POD restarts.
But at times you may want to run a process that runs to completion in a container. For example a process that pulls a code or binary from a repository that will be used by the main web application. That is a task that will be run only one time when the pod is first created. Or a process that waits for an external service or database to be up before the actual application starts. That’s where initContainers comes in.
An initContainer is configured in a pod like all other containers, except that it is specified inside a initContainers section, like this:
1 | apiVersion: v1 |
When a POD is first created the initContainer is run, and the process in the initContainer must run to a completion before the real container hosting the application starts.
You can configure multiple such initContainers as well, like how we did for multi-pod containers. In that case each init container is run one at a time in sequential order.
If any of the initContainers fail to complete, Kubernetes restarts the Pod repeatedly until the Init Container succeeds.
1 | apiVersion: v1 |